Monday, October 24, 2011

Hocus Pocus

 "I've put a spell on you, and now you're mine."

Why should Halloween be only one day a year? Let's celebrate it all week long, shall we?
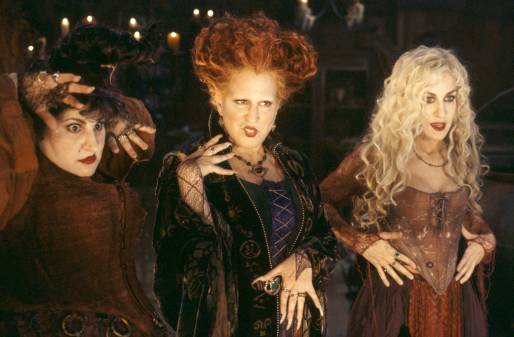
We Shall! And I'm going to start with one of my favorite costumes I've ever made. It's Winifred Sanderson from Hocus Pocus! 

Here's the background on this beauty. First of all, the lovely lady in the photos is really a man. His name is Jordan. And here's the background on the background; when I first moved to NYC three years ago as a lowly costume intern I lived in the apartment in these photos with two other girls (okay, this is only the stairwell, but still). I didn't really like the girls, but they had three friends (who just happened to be gay) living in the apartment above them that I really hit it off with. Jordan was the ring leader and a drag queen. True Love.


You know what else is true love? At least for Jordan here? The fact that he only paid me $50 plus the cost of fabric to make him this wonderful outfit. I was so broke living as in intern that I didn't want to charge him too much for fear he would balk at the cost and not let me build it for him at all. That $50 went toward apple picking upstate with Mike before we where dating, instead of on anything essential like food, rent, or my metro card... Responsible, I know.

But back to my story.

Fun Fact: I love drag costumes! There is something magical about transforming a man into a woman and I love to figure out how to make that happen! Also, it's pretty much the only time where the rule more glitter, more better applies without fear of going overboard. 


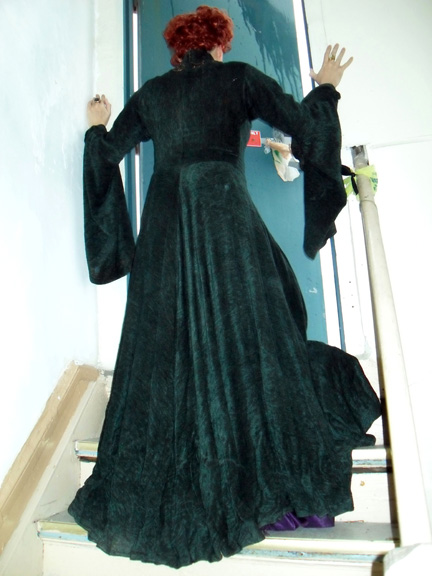
So now let me tell you about the costume itself. It's three pieces; the underskirt, the long jacket with attached bodice, and the busk (the piece down CF that is inserted before lacing since it doesn't kiss when laced. you can see it as a purple point in the top picture sticking out of the bodice).

I draped the top half of the jacket and flat patterned the sleeves, jacket skirt, and underskirt. I may have just done it on the fabric and then cut it out, I don't have a paper pattern anywhere that I can find.

I think I bought 5 yards of the chenille for the jacket and 5 yards for the skirt? Then just one yard of the purple on his bodice and bust. I remember talking the man who sold me the chenille down to $5 a yard...

One of my prouder bargaining moments.


The jacket is most intense piece. I wanted this to go together as quick as possible, so I combined what should have been a separate bodice with the long jacket. It's four skirt panels, the two at side front being half panels so you see the underskirt. Then the jacket has large bell sleeves and a half stand collar (piped, of course). The bodice part I built separately and then attached as one piece after it was finished since the jacket was so heavy to work with. I also attached all the piping on the jacket right before I connected the two pieces. The bodice has steal bones running down CF for some support for his fakes as well as gold eyelets and two frog closures that function but are mainly just for decoration. The busk is just a rectangle with more steal bones and two triangles at the top and bottom to make it look interesting. I need something there since we didn't want the jacket to kiss when laced.


The underskirt is super simple, just a five piece skirt with an open placket in back since the jacket will always cover it. Why five pieces when four would have worked, you ask? Because only the CF panel is purple velvet! Remember when I said this was done on the cheap? Even crappy velvet is pricey, and we wanted something nice. So the rest of the skirt you don't see is made of crappy purple satin to save some money. Brilliant, I know.

Oh, and as for the amount of love that went into this project, all the gold symbols on his sleeves and down the CF of his jacket were painted by hand.

Like I said, true love. And boy do I love how this costume turned out! Almost makes me believe in magic.

And on a side note, I'm super excited because today I start a new job!! Which I know is going to be crazy so don't look for any new projects from me for a while, at least until this new show goes into previews!


Tuesday, October 18, 2011

Jane's Carousal

This September, a fully restored vintage carousal opened down in DUMBO and I have been dying to go check it out! It was originally built in 1922 by the Philadelphia Toboggan Company for Idora Park in Youngstown, Ohio. It's named after Jane Walentas, who rescued it at auction in 1983. She and her husband have been scraping off layers of amusement park paint and repainting the entire carousal since 1984.  It sits in the Brooklyn Bridge Park in a beautiful Plexiglas pavilion designed by Jean Nouvel so you can even ride in the rain.


Tickets are $2 per ride, and the staff is very friendly. In the row of 3 horses only the two on the inside "jump" and the larger horse on the outside is stationary. If all the jumping horse are full, they'll run the carousal with the empty outer horses so everyone can get a chance to ride.

It was marvelous! I felt like I was back in time, enjoying some fresh air from the back of my steed (except no one was making me ride sidesaddle in a floor length skirt).
 

Once they had scraped all the layers of paint down to the original coat, they recorded the original color and where it was on the horse. Then each horse was painstakingly sanded and repainted so the entire carousal isn't just restored, but it looks almost like it did in 1922.
 
Here's a view from the carousal looking out the pavilion. The bridge you see is the Manhattan Bridge. The steel and Plexiglas structure seems like it would be at odds with the carousal, but DUMBO is so industrial that it works with the surrounding architecture and acts as a frame to the carousal.  If you're in the area, it's definitely worth a visit!

Monday, October 17, 2011

Sewing Love

I didn't get around to the Sew Weekly challenge this last week (Musicals) since I've had company last weekend and my mom is visiting this week. So I thought I would take a moment and share my pattern swap partner with you!

I got to send a pattern to Seeks Corey (her blog here)


 I sent her a wonderful 1960s vintage Vogue pattern for a classy wiggle dress with a bolero jacket.


 And as an added bonus, I found this beaded collar decoration while I was in the garment district and decided to send it to her along with a challenge. I told her she needed to make an amazing New Years Eve dress for herself, by dropping the neckline of her pattern and using the collar I sent!


Hooray pattern swaps!

Monday, October 10, 2011

Spanish Harlem, or My Perfect Pencil


For this week's sew weekly challenge, we were told Spanish Harlem. After last week's nightgown, I knew I wanted to make something I could wear in public. I've also come to the decision recently that I don't own enough skirts. But what about sticking with the theme?

Step in the fabric I found earlier this week! It's a wonderful Spanish orange corduroy with a rather busy pattern of diamonds that makes me think of those ikat patterns I've seen ladies wearing around Harlem since this summer. It also happens to fit with my fall palette I'm trying to work in. Pretty perfect, right?!

I took a ton of pictures yesterday while I was sewing. We had beautiful afternoon sunshine filling the apartment and I was inspired to capture my progress as I was chugging along. I've also thrown in a picture of my sewing machine. It was my Christmas gift from everyone in my family last year and I love it so! I also have a domestic Kenmore, but he hasn't seen the light of day since this beauty arrived.


Another awkward photo for everyone out there keeping count!

Please note the fantastic pattern matching and how great my legs look in skirts this length!

I used one of the retro Simplicity patterns I had laying around, number 2154 to be exact. It's a really simple pencil skirt that I shortened by about 5" before I cut out. I could have just patterned it myself, but I've been feeling lazy lately. Also, why make a whole new pattern when you can just adjust a preexisting one to fit your needs?

Like I said, lazy!

Finished hems!
Hemming.

Anyway, I'm quite pleased with how everything turned out. The pattern didn't call for a lining, but I added one. Really, skirts should be lined, and if I'm going to take the time to make myself something you better believe I'm going to make it beautiful. I HATE when homemade outfits look homemade. The kick pleat is wonderful, I made it super short and thick, something different from what I've seen on the back of most skirts.

Kick pleat outside.
Kick pleat inside
Look at that beautiful texture!


Fabric: Spanish Orange Corduroy with diamond design, a one way pattern.

Cost: $18 for a yard of the corduroy and $9 for a yard of the navy Bemberg I used to for the lining. I had the zipper, interfacing and hook in my stock. $27 total!

Time: 2 hours to cut (I ran a basting line by hand down CF and CB since there was pattern matching involved.) and another 4 to assemble.

Details: Fully lined pencil skirt with CB kick pleat, invisible zipper, and hand stitched hem. This garment is made of love, every little detail I could have thought of is in this skirt.

Wear again: Hell yeah! This is going to be a staple in my fall wardrobe, I can't get over how great my legs look!


And on a closing note, I'm taking part in the Sew Weekly pattern swap! I'm so excited, the pattern I bought for my partner just arrived in the mail and tomorrow after work I'm going to stop in the garment district and pick her out some goodies to send with it! I'm thinking something with some sparkle for the upcoming holidays!

Sunday, October 9, 2011

Taco Truck Tacos

One of the more beautiful things in life has to be the food truck scene here in NYC. And few food trucks hold a special place in my heart like the taco truck. Two guys working side by side to bring you joy on a double layer of corn tortillas with fresh cilantro, onion, and the meat of your choice. All usually for under $4. What's not to love? There is a great taco truck called Endless Summer that lives in Brooklyn on North 6th and Bedford Ave in Williamsburg.

If you want the more ethnic experience, you need to head further into Brooklyn to Bushwick, where taco trucks are more plentiful then sit down restaurants. Before moving to Harlem, we lived in Bushwick.  Mike took full advantage of living in the hood, but sadly I didn't discover how much I truly loved tacos until we moved. So on my fall list of things to do, I now have a taco truck tour of Bushwick.

Which brings me to our recipe for tonight. Mike makes the meanest tacos around. This is his take on the "Al Pastor" taco variety. We use chicken since I'm special needs and don't eat pork. Feel free to take this marinade recipe and run with it, there really isn't a bad use for it that we can think of. This marinade has some spice (okay, a lot, it's those peppers) so make sure you try it as you go and adjust to taste.

Al Pastor Marinade (this makes enough marinade for tacos for 8, but it also keeps well to use again)
1 7 oz. can La Morena Chipotle Peppers in Adobo Sauce
4 slices of pineapple (fresh is best, but canned is good too)
3 Tbs. vegetable oil

Mix these together in a blender and blend until smooth. If it's too spicy for you, add more pineapple to taste.


The rest of the recipe is for two people. Just add more chicken to increase the recipe.

4 Chicken Thighs
To prep your chicken:
Remove the skin and save for later in the week (a blog post about chicken skin to follow).

Once you have your marinade and chicken ready, mix together and let it sit in the fridge for about 4 hours.
Throw it in the oven (uncovered) for about an hour at 400. After 30 minutes keep checking on it until the chicken is so tender its falling apart. While the meat is in the oven, you should prep the taco fixings. The sky's the limit, but here's what we think you should use:

1 package of good corn tortillas (the denser the better, ours come from this dive-y grocery store in Harlem, they will make or break your tacos) 
1 bunch of finely chopped cilantro
1 bunch of sliced radish
1 diced sweet onion (red or vedalia)
1 lime cut up in slices
some of the extra marinade for spreading on the tortillas

Once your chicken is cooked remove from the oven and let rest for 10 minutes. Remove the meat from the bone and dice.

Turn on your stove and use it as a grill to slightly char the tortillas. Assemble the fixings on the table and let everyone make their own, but first encourage everyone at the table to double wrap their tacos! Simply layer two tortilas together before heaping them with taco goodness. Squeeze the lime slices over the tacos as the last step and enjoy!


As a drink suggestion, may I recommend the Hemingway Daiquiri? It's a wonderful classic cocktail with a tart bite that pairs nicely with the spice of the Al Pastor marinade.

According to the cocktail book "Speakeasy" by Jason Kosmas and Dushan Zaric of Employees Only here in NYC, the Hemingway Daiquiri is rumored to have been invented for Ernest Hemingway at the La Floradita bar in Cuba. They call him an Olympian cocktail connoisseur. Clearly Hemingway's the man and knows what's best. Take a page out of his book and make yourself two!

Hemingway Daiquiri (makes one drink)

2 oz. White Rum
1/2 oz. Luxardo maraschino liqueur
1/2 oz. Lime juice
dash of Simple syrup
Lime for garnish

Pour the rum, liqueur, juice and syrup into a mixing glass, fill with ice cubes and shake vigorously. Strain into the glass of your choice and garnish with the lime.

And there you have it, our take on taco truck tacos with a tangy cocktail to stand up to the spice!


Thursday, October 6, 2011

Fabric Find!


I found a really fantastic narrow wail courdory with a slightly vintage feel yesterday while I was out and about. $18 a yard at New York Elegant in the garment district. They are a little pricey, but always have beautiful stuff. I also picked up a really dark navy Bemberg lining that matches the navy in the pattern.
Just you wait, I've got glorious plans for this fabric!

Wednesday, October 5, 2011

Think Pink, or The Night Cap Chemise

Let me start this post by saying what everyone has been thinking, "about time!" I know, I know. But better late then never! And, oh how glorious this chemise is.


I started with Simplicity 2890, then added the straps and sash to give me a little shape. The pattern is cut to just be this giant rectangle of a chemise that gets smushed into a corset. Not so attractive by its self. I also added the black lace and the pearls. They lend it some 1960s drama that made me decide the perfect setting for these pictures was pouring myself a night cap at the bar.


 Look at how beautiful the fabric drapes! It just seems to flow across my shoulders and down my back.


Fabric: I have a wonderful story about this fabric! It's some kind of a silk blend that I got while I was in Abu Dhabi last winter. I was there for work for two weeks and where I was staying also just happened to be their version of the garment district! I haggled, but the dollars to dirhams conversion was still in my favor so I'm not too upset knowing they probably still over charged me. But back to the fabric, it just spoke to me when I walked in the door of the store. It's so soft it feels and looks like the petals of a flower. I ended up buying 2 yards. I bought it with the plan of making a robe, but I thought a chemise would fit the fabric better.


Cost: 20 dirhams (about $5.70) for the fabric, and then I bought the black lace too $8 for two yards. The pearls were in my stock and the pattern cost me $1 at a Joanne's sale in Portland, ME. So total? About $15.

Time: 6 hours to cut and assemble, then about 4 more for hand sewing lace and pearls. I ignored the pattern direction for armhole facings (what?! let's add bulk where we want it the least, okay Simplicity) and just made all my seams french seams. So to make that easier on myself I made sure to set in the sleeves before I closed my side seams. My sleeve hems and skirt hem are all 1/8" rolled hems (I'll have to show you my trick later, it looks amazing! and goes super quick)

Wear again: For sure! Just never out of the house. This is an apartment only look, consider yourselves lucky you got photos of me wearing it. I almost just put it on the dress form, but that wouldn't have done it justice. 

Just look at how lovely my shoulders look peaking through the fabric!


 This last picture here is the neckline. I love the trick of a massive amount of gathering over the chest to make it look like my waist is itty-bitty when I add the sash. Perfect! In closing, I love the drape, the neckline, the shape, and how wonderful I feel in this nightgown!